A Project Painter Plus that runs but will not pull paint is almost always dealing with air or a stuck check ball, not a dead pump. Check six things in this order: the Prime/Spray valve is pointing down, the inlet strainer is clean and under the paint, the pump has been primed with water first, the inlet check ball is free (push it with a pencil or Power Flush), the outlet check ball is clean, and the suction tube is not drawing air. The parts that fix what cleaning cannot are inlet valve kit 16E844 and outlet valve kit 16E845.
- The motor running and the pump clicking means the electrical side is fine. The problem is in the fluid path.
- Most no-prime calls after storage are one small ball stuck to its seat at the bottom of the pump.
- Work from the outside in. The first three checks need no tools and solve a large share of cases.
- Storage fluid after every job is what keeps this from happening again.
- How Priming Works on This Sprayer
- Before You Touch Anything: Relieve the Pressure
- The Six Checks, in the Order That Saves Time
- When the Paint Itself Is the Problem
- When Cleaning Is Not Enough: The Parts That Fix Priming
- Problems That Look Like "Won't Prime" but Are Not
- Four Things Not to Do
- A Three-Minute Routine That Prevents It
- Repair It or Replace It?
- Frequently Asked Questions
The Project Painter Plus (model 257025) is the smallest sprayer in Graco's Magnum line, and it is usually bought for one project, put on a shelf, and pulled out again months later. That pattern is exactly what produces the most common complaint about it: the switch is on, the motor hums, the pump clicks away, and nothing comes up the suction tube.
It feels like a failure. In most cases it is not. A piston pump can only move paint if two small check valves seal properly and no air is leaking into the suction side, and both of those conditions are easy to lose on a machine that has been sitting. This guide follows the same order Graco's own troubleshooting uses, starting with the checks that cost nothing.
1. How Priming Works on This Sprayer
Understanding the mechanism takes a minute and makes every step below make sense.
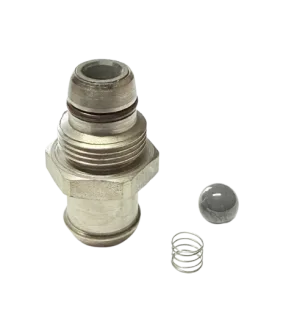
Inside the pump, a stainless steel piston moves up and down. On the upstroke it creates suction, which lifts a small ball off its seat at the bottom of the pump (the inlet valve) and draws fluid in through the suction tube. On the downstroke that ball drops back and seals, and the fluid is pushed past a second ball (the outlet valve) toward the hose.
Priming is simply getting the air out so the pump is moving liquid instead of air. That is the job of the Prime/Spray valve. Pointing down, it opens a path to the small prime tube so air and fluid can escape freely with no back pressure. Pointing forward, it closes that path and sends everything to the hose and gun.
So a pump fails to prime for only a few reasons: the valve is in the wrong position, fluid cannot reach the inlet, one of the two balls is not sealing or not lifting, or air is getting in where it should not. Every check in this guide is one of those four.
2. Before You Touch Anything: Relieve the Pressure
Even a sprayer that will not prime can hold pressure in the hose from the last time it worked. Airless equipment runs at pressures that can inject paint through skin, and that is a surgical emergency rather than a cut.
- Turn the power switch off and unplug the sprayer.
- Turn the Prime/Spray valve down to PRIME to release pressure.
- Hold the gun against the inside of a waste pail and pull the trigger.
- Engage the trigger lock.
Relieve pressure before you remove the suction tube, a fitting, the tip or the gun filter. It takes ten seconds and it is the one step in this guide that is not optional.
3. The Six Checks, in the Order That Saves Time
The order matters. Each check is cheaper and quicker than the one after it, so do not skip ahead to the valves because a forum post said so.
Check 1: The Prime/Spray valve is pointing down
It sounds too simple to be the cause, and it is the cause more often than any part failure. If the valve is pointing forward at SPRAY, the pump has to push the air in it against a closed hose and gun. It cannot, so it never primes.
Turn the valve so it points down. Put the prime tube into the waste pail, switch on, and watch the tube. Sputtering air followed by a steady stream means the pump has primed. Only then turn the valve forward.
Check 2: The strainer is clean and the tube is under the paint
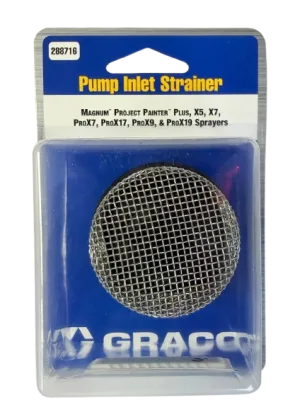
The suction tube ends in a 35 mesh stainless strainer. Paint skin, dried flakes from the pail rim and old residue collect on it, and a partly blocked strainer starves the pump. Pull the tube out, rinse or brush the strainer, and look at the paint level while you are there.
The tube has to stay completely submerged. In a nearly empty pail, or a pail tipped at an angle, the pump draws a mix of paint and air and loses its prime the moment the level drops. If the strainer is torn or crushed, replace it rather than running without one: strainer 288716 is the only thing keeping debris out of the valves.
Check 3: Prime with water before you prime with paint
A dry pump struggles to lift thick paint. Water is thin, so it wets the piston and the valves and gives the pump a seal to pull against.
Lift the suction tube out of the paint and set it in a pail of clean water (use the correct flushing fluid if the last coating was oil-based). With the valve at PRIME, run the pump until water flows from the prime tube. Then move the suction tube back into the paint and let the paint push the water out before you switch to SPRAY. Graco lists "pump was not primed with flushing fluid" as a cause in its own right, so this is a fix and not just a warm-up.
Check 4: Free the inlet check ball
This is the one that catches nearly everyone after storage. When a sprayer is put away with a little paint or water left in the pump, the residue dries and holds the inlet ball against its seat. The piston moves, but the ball never lifts, so nothing enters the pump.
There are two ways to free it, and both come straight from Graco's troubleshooting:
- The pencil method. With pressure relieved and the sprayer unplugged, pull the suction tube off the pump inlet. Push a pencil gently up into the inlet until you feel the ball move. Use something soft like a pencil, not a screwdriver, so you do not scratch the seat.
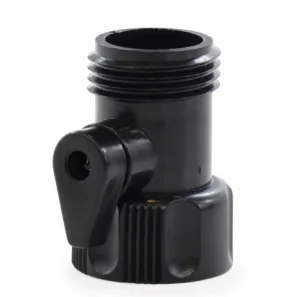
- Power Flush. Attach the Power Flush adapter and a garden hose to the suction tube and run water through the pump for about a minute, then refit the strainer and prime again. The flow of water knocks the ball loose and rinses the residue away.
The adapter connects the sprayer to your garden hose. Never use it after oil-based or solvent-based coatings. Flush those with the cleaning fluid the coating calls for.
Check 5: Clean the outlet check ball
If the inlet ball is free and the pump still will not prime, the outlet ball is the next suspect. A ball stuck closed blocks the path out of the pump. A ball held open by a flake of dried paint lets fluid slip back on every stroke, so the pump works without getting anywhere.
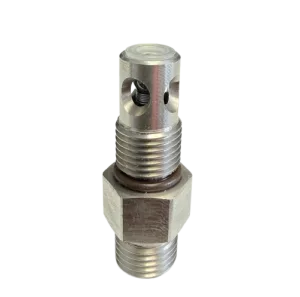
On this pump family, remove the outlet fitting, lift out the ball, and clean both the ball and the seat it rests on. The ball should be smooth and shiny. If you can see a flat spot, pitting or a ring worn into the seat, cleaning will not restore the seal and the valve needs replacing.
Check 6: Look for an air leak on the suction side
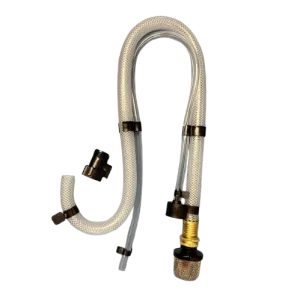
A pump that primes for a few seconds and then loses it, or that spits bubbles from the prime tube no matter how long it runs, is drawing air. Inspect the suction tube along its whole length for cracks, cuts and kinks, and confirm the clamp is seated where the tube meets the pump. These tubes get bent sharply in storage and stepped on in garages.
A cracked tube cannot be repaired reliably with tape. Suction set 24V074 replaces the tube assembly as one piece.
4. When the Paint Itself Is the Problem
If all six checks pass and the pump primes perfectly with water but not with paint, look at the paint. Very thick or sticky material can be more than a small pump will lift, especially when the paint is cold.
The Project Painter Plus delivers up to 0.24 gallons per minute and is built to spray unthinned interior and exterior paints. Some heavy-bodied products, such as elastomeric coatings and block fillers, are outside what a pump this size is meant for. For paint that is simply cold or thick, bring it to room temperature, stir it thoroughly, strain it, and thin it only as far as the paint manufacturer's label allows.
Graco also suggests a simple trick with thick material: switch the power off briefly so the pump slows and stops, then switch it back on, and repeat as needed. Each restart gives the pump a fresh stroke against the heavy fluid.
5. When Cleaning Is Not Enough: The Parts That Fix Priming
Cleaning fixes a stuck ball. It does not fix a worn one. If a valve is scratched, pitted or simply tired, the sprayer will prime badly again within a job or two. These are the parts involved, and when each is the right answer.
| Part | Part number | Replace it when |
|---|---|---|
| Inlet valve repair kit | 16E844 | The inlet ball or seat is pitted or worn, or the ball keeps sticking soon after cleaning |
| Outlet valve repair kit | 16E845 | The pump primes with water but will not hold pressure, or the outlet ball shows wear |
| Inlet strainer | 288716 | The mesh is torn, crushed or permanently clogged with cured paint |
| Suction set assembly | 24V074 | The tube is cracked, cut or kinked and the pump draws air |
| Power Flush valve | 115648 | The adapter is lost or leaking at the hose connection |
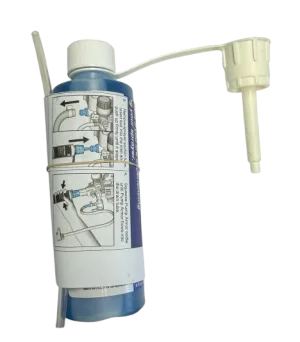
| Pump Armor, 8 oz | 17S980 | Every time the sprayer is stored (this is the prevention, not the repair) |
Every one of these is listed with its place on the exploded diagram in our Project Painter Plus 257025 parts list. If your sprayer is a different Magnum, the Graco homeowner paint sprayer parts section has each model separately, because valve kits are not the same across the whole range.
6. Problems That Look Like "Won't Prime" but Are Not
Three faults get described as a priming problem and need a different fix.
It primes, but nothing comes out of the gun
Paint flows from the prime tube, yet the gun is dry when you pull the trigger.
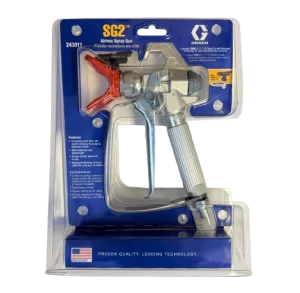
Check in order: the Prime/Spray valve is turned forward to SPRAY, the tip is not clogged (rotate it 180 degrees, trigger into a pail for a second, rotate it back), and the gun filter in the handle is clean. Parts for the gun are in the SG2 and SG3 spray gun listings.
It primes, sprays, then fades
The pump runs constantly and the fan gets weaker.
Likely cause: a worn tip, a clogged filter or worn pump valves. That is a pressure problem, covered step by step in our guide to fixing a Graco sprayer that will not build pressure.
The switch is on and nothing happens at all
No motor sound, no clicking.
Likely cause: power, not priming. Check the outlet and the extension cord, and make sure the pressure control knob is turned up. A motor that stops once pressure has built is normal: it starts again when you pull the trigger.
If the sprayer is a larger contractor model instead of a Magnum, the causes overlap but the parts do not. Our general guide to a Graco airless sprayer not priming covers those machines.
7. Four Things Not to Do
- Do not let it run dry for minutes. If nothing is coming up after 30 seconds or so, stop and work through the checks. A piston pump relies on fluid for lubrication, and long dry running wears the packings.
- Do not poke the inlet with metal. A screwdriver frees the ball and scores the seat in the same motion. A scratched seat leaks permanently.
- Do not pour thinner into a sprayer used for latex. Flush water-based paint with water. Solvents are for oil-based coatings and only the ones the coating label names.
- Do not remove the strainer to "help it prime." It will prime, and the first flake of dried paint will lodge in a valve or the tip.
8. A Three-Minute Routine That Prevents It
Nearly every Project Painter Plus that will not prime in spring was put away in autumn with something left inside it. The fix is a habit, not a part.
- Flush until the water runs clear
After water-based paint, use the Power Flush adapter or draw clean water from a pail until what comes out of the prime tube and the gun is clear.
- Clean the three filters
Rinse the inlet strainer, pull and rinse the gun filter, and clear the tip. Dried paint in any of them is the start of the next clog.
- Draw Pump Armor through the pump
Put the suction tube in the Pump Armor bottle and the prime tube in a waste pail, and run the pump at PRIME until the fluid appears at the prime tube. It keeps the check balls from sticking, prevents corrosion, and protects the pump if the garage freezes.
- Close the valve and store it indoors
Switch off as soon as the fluid appears, then turn the Prime/Spray valve forward to SPRAY. That is the step Graco's manual gives for keeping the storage fluid inside the pump. Set the trigger lock and keep the sprayer somewhere that does not freeze.
The difference between Pump Armor and the throat seal liquid used on contractor sprayers confuses a lot of owners. They do different jobs, and our article on TSL vs Pump Armor explains which one your sprayer needs.
9. Repair It or Replace It?
For a priming fault, repair is nearly always the sensible choice. A valve kit, a strainer or a suction set costs a small fraction of a new sprayer and fits in minutes with basic tools.
The calculation changes only when the pump is worn out from workload. Graco rates the Project Painter Plus for about 50 gallons a year, with a maximum tip of 0.015 inch and up to 50 feet of hose. A unit used well past that, for example by someone repainting rental properties every month, will wear its pump faster than any valve kit can make up for. In that case the better money is on a model built for the volume. If you are weighing that up, compare the parts and ratings in the Magnum X5 parts list, the next model up.
Not Sure Which Part Your Sprayer Needs?
Send us the model number from the label and a short description of what the pump is doing. We will confirm the right valve kit before you order.
Ask Our Parts Team Call +1 713-931-4102Project Painter Plus Parts for Priming Problems
10. Frequently Asked Questions
Why does my Graco Project Painter Plus run but not pull paint?
The most common reason is a stuck inlet check ball. Dried paint or storage residue glues the small ball to its seat at the bottom of the pump, so the piston moves but nothing is drawn in. Remove the suction tube and push a pencil into the pump inlet to free the ball, or Power Flush the sprayer with a garden hose for about a minute. Before that, confirm the Prime/Spray valve is pointing down at PRIME and that the inlet strainer is clean and fully under the paint.
Which way should the prime valve point on a Project Painter Plus?
Down for priming, forward for spraying. With the valve pointing down, the pump sends fluid out of the prime tube, which lets it purge the air in the pump. Once paint flows steadily from the prime tube, turn the valve forward to SPRAY so the pump can build pressure in the hose.
How do I unstick the inlet valve on a Graco Magnum sprayer?
Relieve pressure and unplug the sprayer, pull the suction tube off the pump inlet, and push a pencil gently up into the inlet until you feel the ball move. Graco lists this as the remedy for a stuck inlet valve check ball. The alternative is to Power Flush: attach the Power Flush adapter and a garden hose to the suction tube and run water through the pump for about a minute.
Can I use the Power Flush adapter with oil-based paint?
No. Power Flush connects the sprayer to a garden hose, so it is only for water-based materials. After spraying oil-based coatings, flush with the cleaning fluid the coating manufacturer specifies, such as mineral spirits, and finish with Pump Armor before storage.
What parts fix a Project Painter Plus that will not prime after cleaning?
If the check balls move freely and the sprayer still will not prime, the usual parts are the inlet valve repair kit 16E844, the outlet valve repair kit 16E845, the inlet strainer 288716, or the suction set 24V074 if the tube is cracked and drawing air. Replace the valve kits when a ball or seat is pitted, scratched or worn rather than just dirty.
Is it worth repairing a Project Painter Plus?
Usually yes when the fault is a valve, strainer or suction tube, because those repairs cost a fraction of a new sprayer and take a few minutes. It is less clear when the pump itself is worn after heavy use. The Project Painter Plus is rated for about 50 gallons a year, so a unit that has been run well beyond that and no longer builds pressure may be better replaced with a larger model.
How do I stop the sprayer from failing to prime next time?
Flush it until the water runs clear after every use, then draw Pump Armor through the pump before you put it away. Storage fluid keeps the check balls from sticking to their seats and protects the pump from corrosion and freezing. Most sprayers that will not prime in spring were stored with water or paint residue inside.